
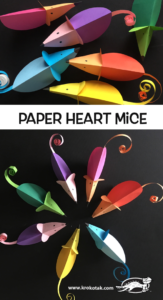
These cute mice rock back and forth too!
Supplies:
- Ruler
- Round shape that is about 3 inches in diameter
- Pencil
- Glue stick
- Markers
- Cardstock or scrapbook paper (at least 2 different colors)
Directions:
- Cut two 3 inch circles, one out of each color paper. Fold them both in half and make a clean sharp fold.
- Take one of your circles and draw a heart shape from the fold. Cut out the heart shape, leaving the crease in.
- Now, take your heart shaped circle and fold down the two rounded tops or ‘lobes’ of the heart. These will be the mouse ears.
- Now, open up the heart. With the black marker draw a nose at the tip of the point and two eyes mid-heart, one on each side of the fold.
- With the glue stick, glue the inside of the heart-shaped head from the bottom of the ear (where you folded them) to the bottom point. Do not glue the ears!
- Line up the fold of the heart-shaped head and the fold of the circle, which will become your mouse body. Press the two together until the glue is secure.
- From either of the two card stock sheets, cut a strip that is approximately 3 inches by ¼ inch. This will be the tail. Roll the paper up tightly to create a curly look, leaving about ½ inch straight and uncurled. The ½ inch that is straight , you will fold in half.
- Put glue on the the ½ inch straight section. Line up the crease/fold of the tail to the fold at the end of the body and attach the tail to the body.
- Your mouse will now rock back and forth. Have fun with your mouse.
Now that you know how to make the mouse you can make all different colors and designs with the leftover cardstock!
Activity by Cheryl Moy, Bates Site
Photo Credit and Inspiration: www.krototak.com
The link above also has step-by-step photo instructions for this project!