
These are sure to come in handy as you complete your summer reading list!
Materials:
- Felt
- Marker
- Glue
- Large paper clips
- Scissors
- Hot glue (optional)
Instructions:
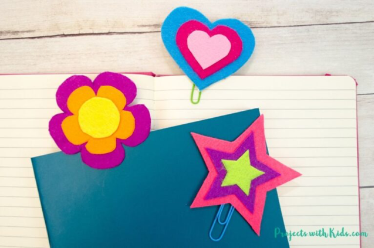
- Outline your designs on the felt with a marker. Simple shapes like stars, circles, and hearts are easiest to cut out. If you want to do more complicated designs like animals, we recommend drawing them out on a piece of paper, cutting it out, and using that as a template on your felt to prevent waste.
- Cut two pieces of felt for each shape as the paper clips will be ‘sandwiched’ with felt. The back piece doesn’t need to have a design on it but you can add one if you would like.
- Cut out smaller designs to go on top of the large base that will become the front of your bookmark. Strips of felt become stripes, small circles can be polka dots, and triangles are great for the nose on a face! Glue your decorations to the larger pieces of felt.
- Lay your felt bookmark facedown and place a paper clip on it with the double U side off the felt. If you want a more secure hold, ask an adult to add a drop of hot glue where the paper clip touches the felt. This step is optional.
- Add regular glue on top of the back side of your felt and paper clip. Don’t forget to put glue on the inside of the paper clip! Take your identical felt shape and press it into the glue to make a paper clip sandwich. Let your bookmark dry completely before using!
Note: Sticky back felt makes this project even easier! You do not need glue or drying time if your felt has an adhesive back. Just be careful when making your paper clip sandwich—you may only have one chance to get the felt stuck together properly!
Activity by Tiana Chu, Floating Teacher
Photo Credit & Inspiration: www.projectswithkids.com